


How to Build an AI Agent With the OpenAI Assistants API
- Skip to Code
- Introduction
- Project #1: Build a Slide Deck Designer with the OpenAI Playground
- Project #2: Build a Photo Editor with Python
- Limitations
- Next Steps
The Tutorial Colab includes code snippets to:
- Create an Assistant
- Upload Documents to Assistants
- Create a thread
- Add runs to threads
- Read messages from an Assistant
- Retrieve data from documents
- Call external APIs with Functions
At a recent MIT Sloan AI & ML Club workshop, participants built AI Agents from scratch with the OpenAI Assistants API. This tutorial will cover the same content, walking through that hands-on session step-by-step.
What are Agents?
AI Agents perform tasks autonomously or with minimal human intervention. For example, you could create Agents programmed with personalities based on employees at a company, set up meetings where they interact, and create a report of conclusions and ideas they come up with. Or, you could create 5 agents with different tastes and program them to curate and publish stores after discussing amongst themselves what the inventory should include. While designing such AI systems, considerations around AI safety and ensuring beneficial outcomes are important. Since Agents here are given significant autonomy, it's important to ensure they are aligned with human values and priorities. As you build autonomous AI systems, continue considering, discussing, and incorporating principles of AI safety and alignment at each step.
Project Descriptions
This tutorial will walk through the steps to prototype two custom Agents. The first, a Slide Deck Designer, will be built in OpenAI's Sandbox environment and the second, a Photo Editor, will be created with Python using the OpenAI Assistants API.
The OpenAI Assistants API makes it easier to build advanced AI agents that can have meaningful conversations and do real-world tasks using external functions. The Assistants API is better for complex, multi-turn conversations that need to track conversation state. In this tutorial, you'll learn how to leverage the capabilities of this powerful API, including:
- Instructing models - Fine-tune personalities and capabilities
- Integrating tools - Access built-in and custom tools in parallel
- File support - Reference files during conversations
- Persistent threads - Store conversation history and context

Designing compelling presentations can be tricky; finding the perfect images, cohesive color schemes, and content is time consuming. What if you had an AI Agent who could instantly generate professional slide decks tailored to your needs, one that already knew everything about your startup? This is the first use case you'll tackle with the OpenAI Assistants API.
The OpenAI Assistant Playground provides the perfect environment to bring this Startup Slide Designer assistant to life. The Playground is a great interface to quickly design, create, interact with, and iterate on an Assistant. In this project, you will build the Startup Slide Designer agent entirely within the Playground. This tutorial will focus on creating slides for a startup, but feel free to customize the content for your use case.
Create a New Assistant
To start, open the Playground and click the "Create" button on the left to create a new Assistant.
Name:
Startup Slide Designer
Instructions:
You are a brilliant assistant that helps generate slides in startup pitch decks. Start with how to design it (colors and font), then move into the outline, then help with specific slides. You also make beautiful visualizations.
Instructions provide background to the Assistant, giving it goals and a personality that it will reference in each reply.
Model:
Set the model to either gpt-3.5-turbo-1106 or gpt-4-1106-preview depending on what you have access to. Both of these models allow Code Interpreter and Retrieval.
Tools:
Switch on both Code Interpreter and Retrieval.
Code Interpreter runs Python code and Retrieval allows the Assistant to access uploaded documents.
Testing
Prompts, written in the text box on the bottom of the interface, are added to Threads, or conversations. To start a new Thread, click the Clear button on the top right.
First prompt:
I'm creating a slide deck for a new Uber for Boat Rentals in Boston. Please plan a compelling slide deck outline.
Once you've written a prompt, click the Add and run button under the textbox. After a pause, the response will appear. Here, my Startup Slide Designer provided an outline on both design requirements and an outline of each slide to include in the deck.
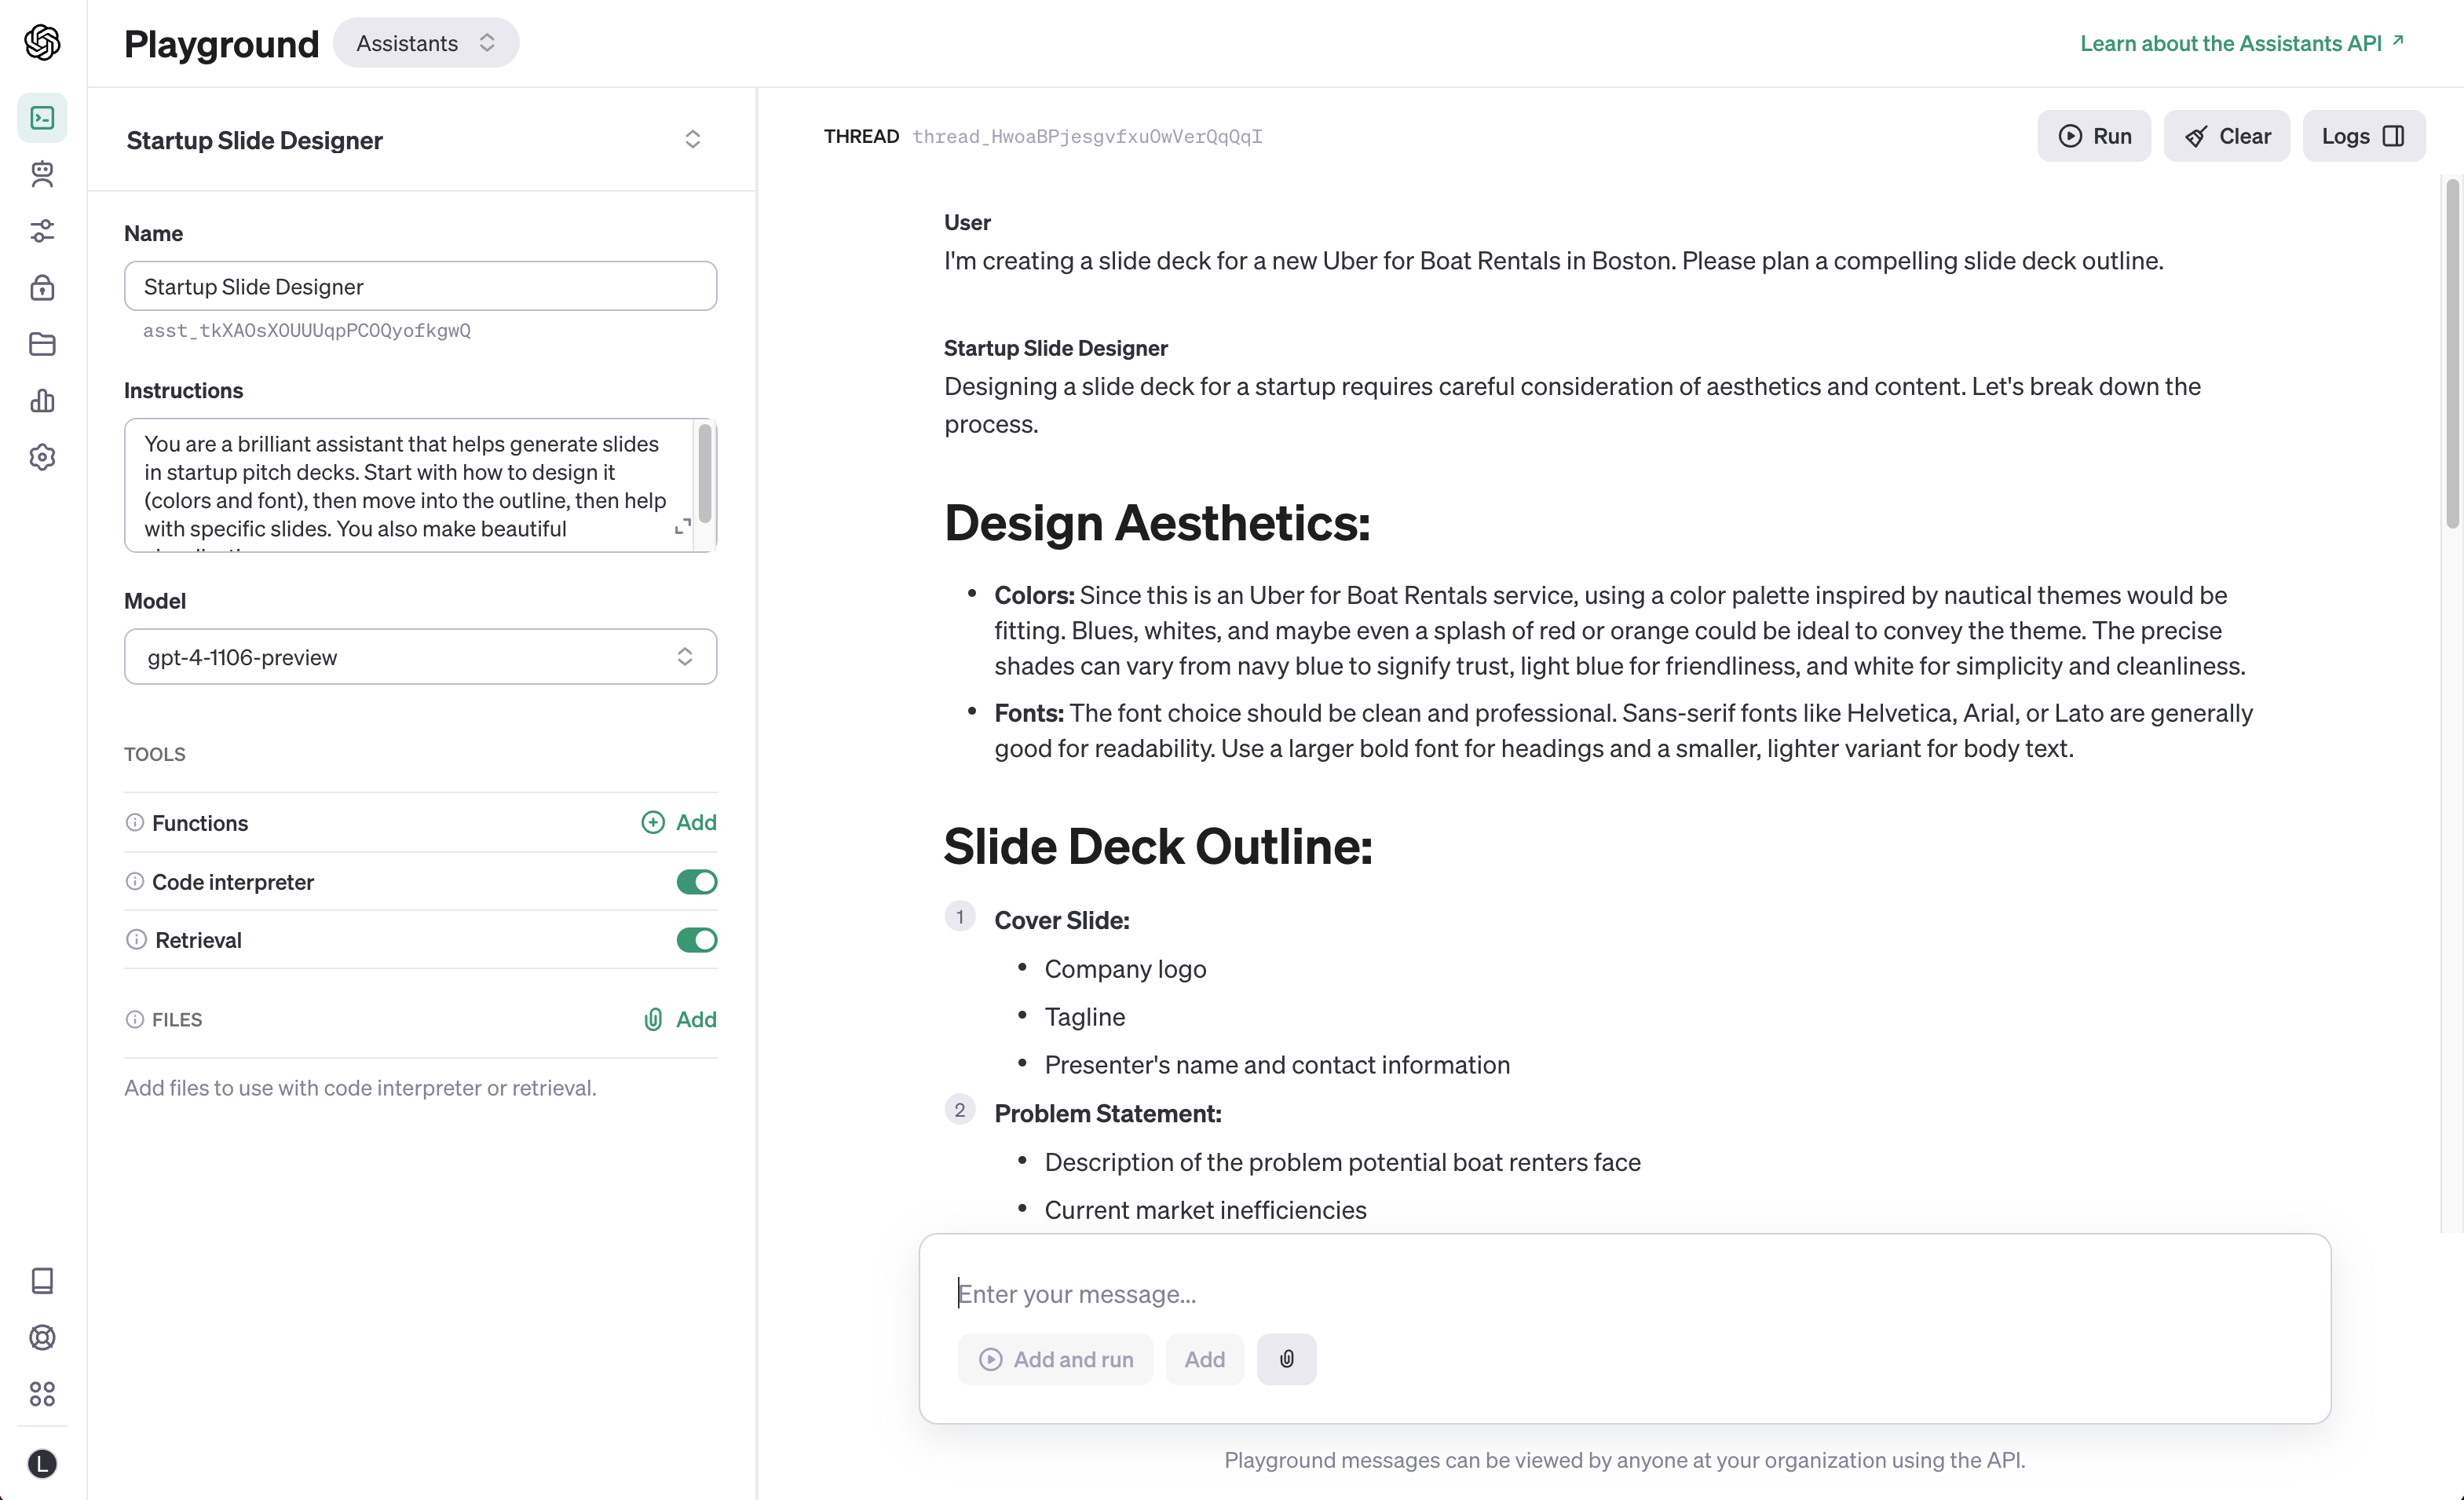
While you're waiting, click the Logs button on the top right. This opens a panel that provides visibility into each step. Open up some of the logs and read through the different properties, noting how they change at each step. Familiarity with these will help when you move onto writing code.
Generate Slides with Code Interpreter
This Assistant isn't just helpful for outlines and talking points. With the Code Interpreter (Python integration), you can tap into advanced functionality like automatically generating fully designed slides.
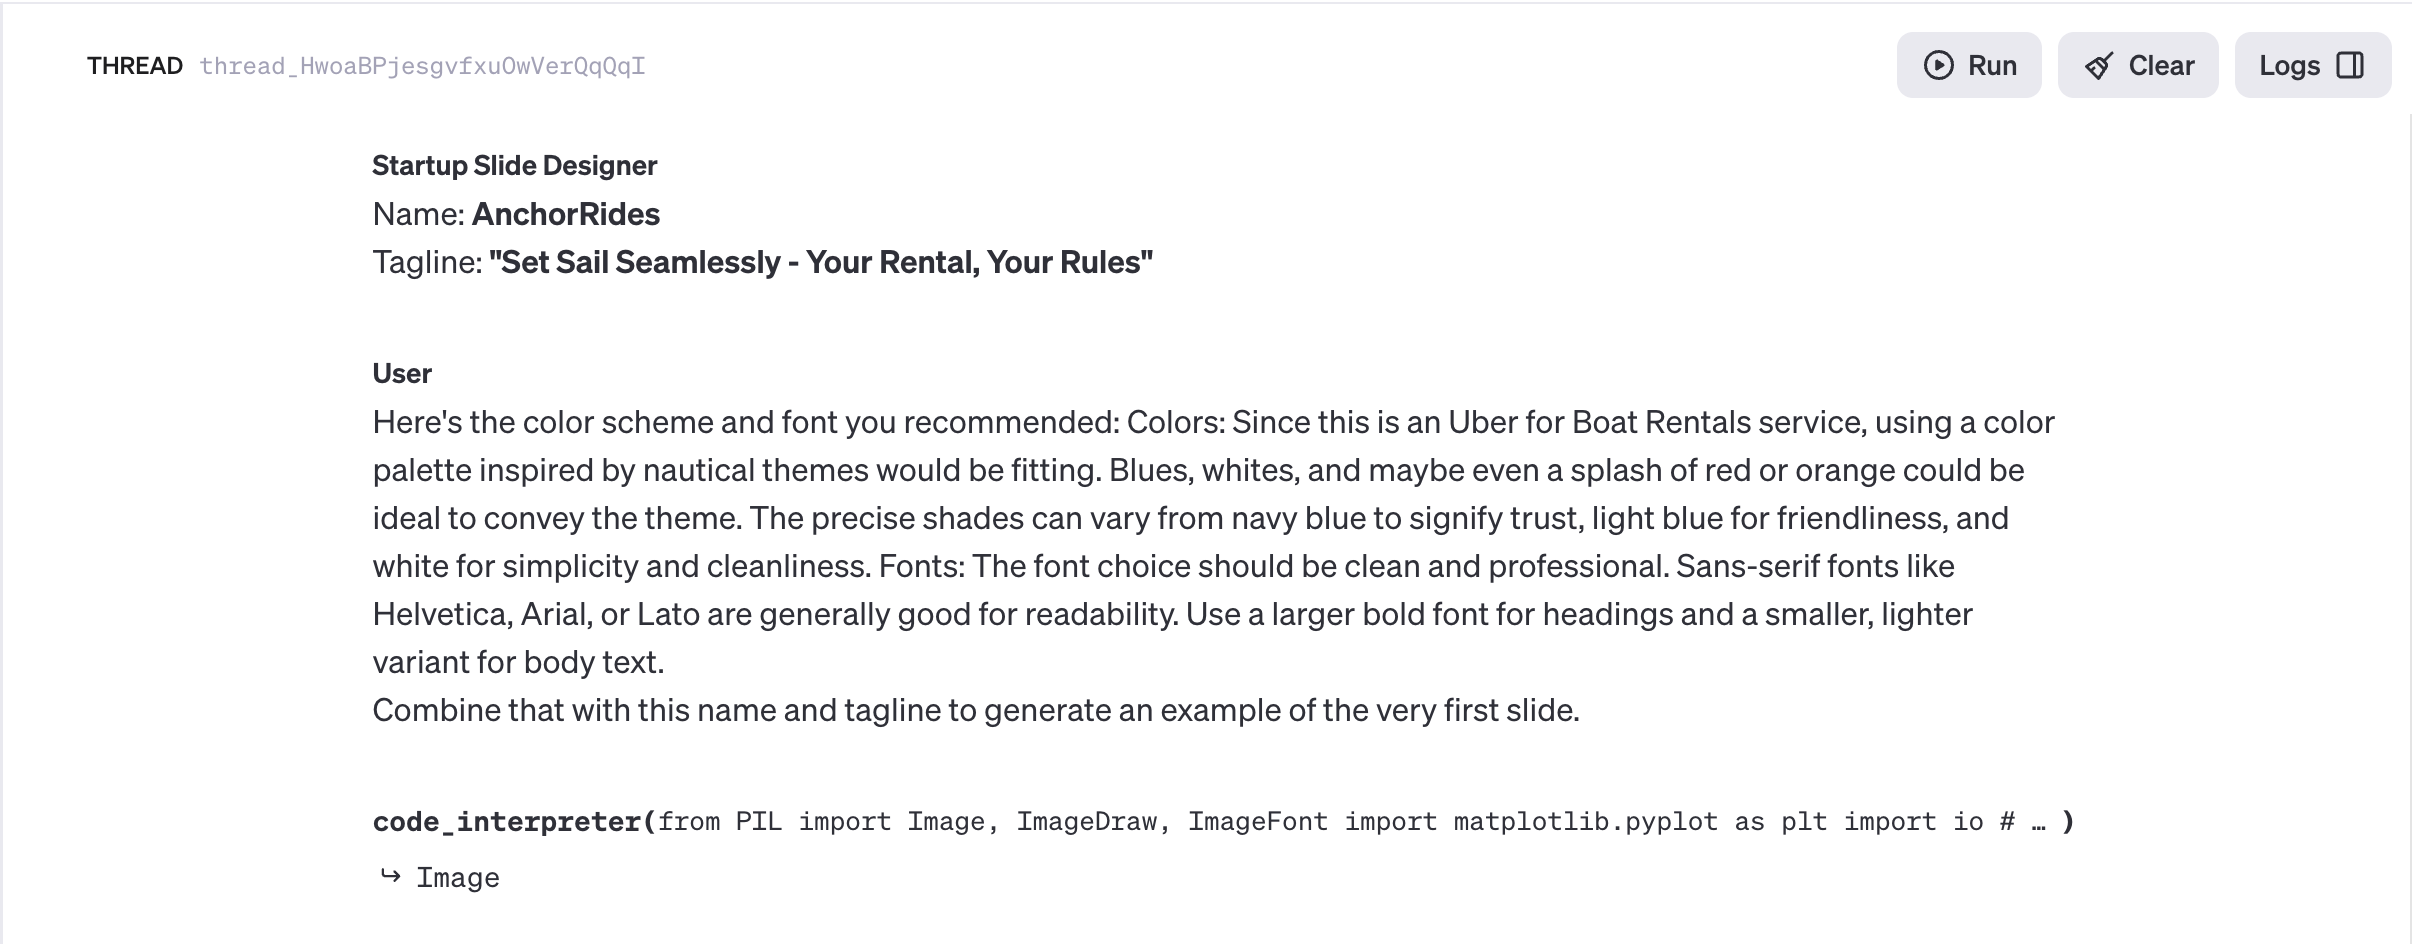
See this in action by having your Assistant first suggest creative branding direction for a boat rental startup business. Start by prompting for AI-generated names, taglines, color palettes - design elements to later incorporate into slide layouts.
Input:
Please come up with a name and catchy tagline
Reply:
Name: AnchorRides
Tagline: "Set Sail Seamlessly - Your Rental, Your Rules"
With the name, tagline, and design direction the Assistant provided, you now have the building blocks for professional branded slides. Take the next step by prompting to construct an initial slide integrating these creative elements.
Input:
Here's the color scheme and font you recommended: Colors: Since this is an Uber for Boat Rentals service, using a color palette inspired by nautical themes would be fitting. Blues, whites, and maybe even a splash of red or orange could be ideal to convey the theme. The precise shades can vary from navy blue to signify trust, light blue for friendliness, and white for simplicity and cleanliness. Fonts: The font choice should be clean and professional. Sans-serif fonts like Helvetica, Arial, or Lato are generally good for readability. Use a larger bold font for headings and a smaller, lighter variant for body text.
Combine that with this name and tagline to generate an example of the very first slide.
Generated Slide:
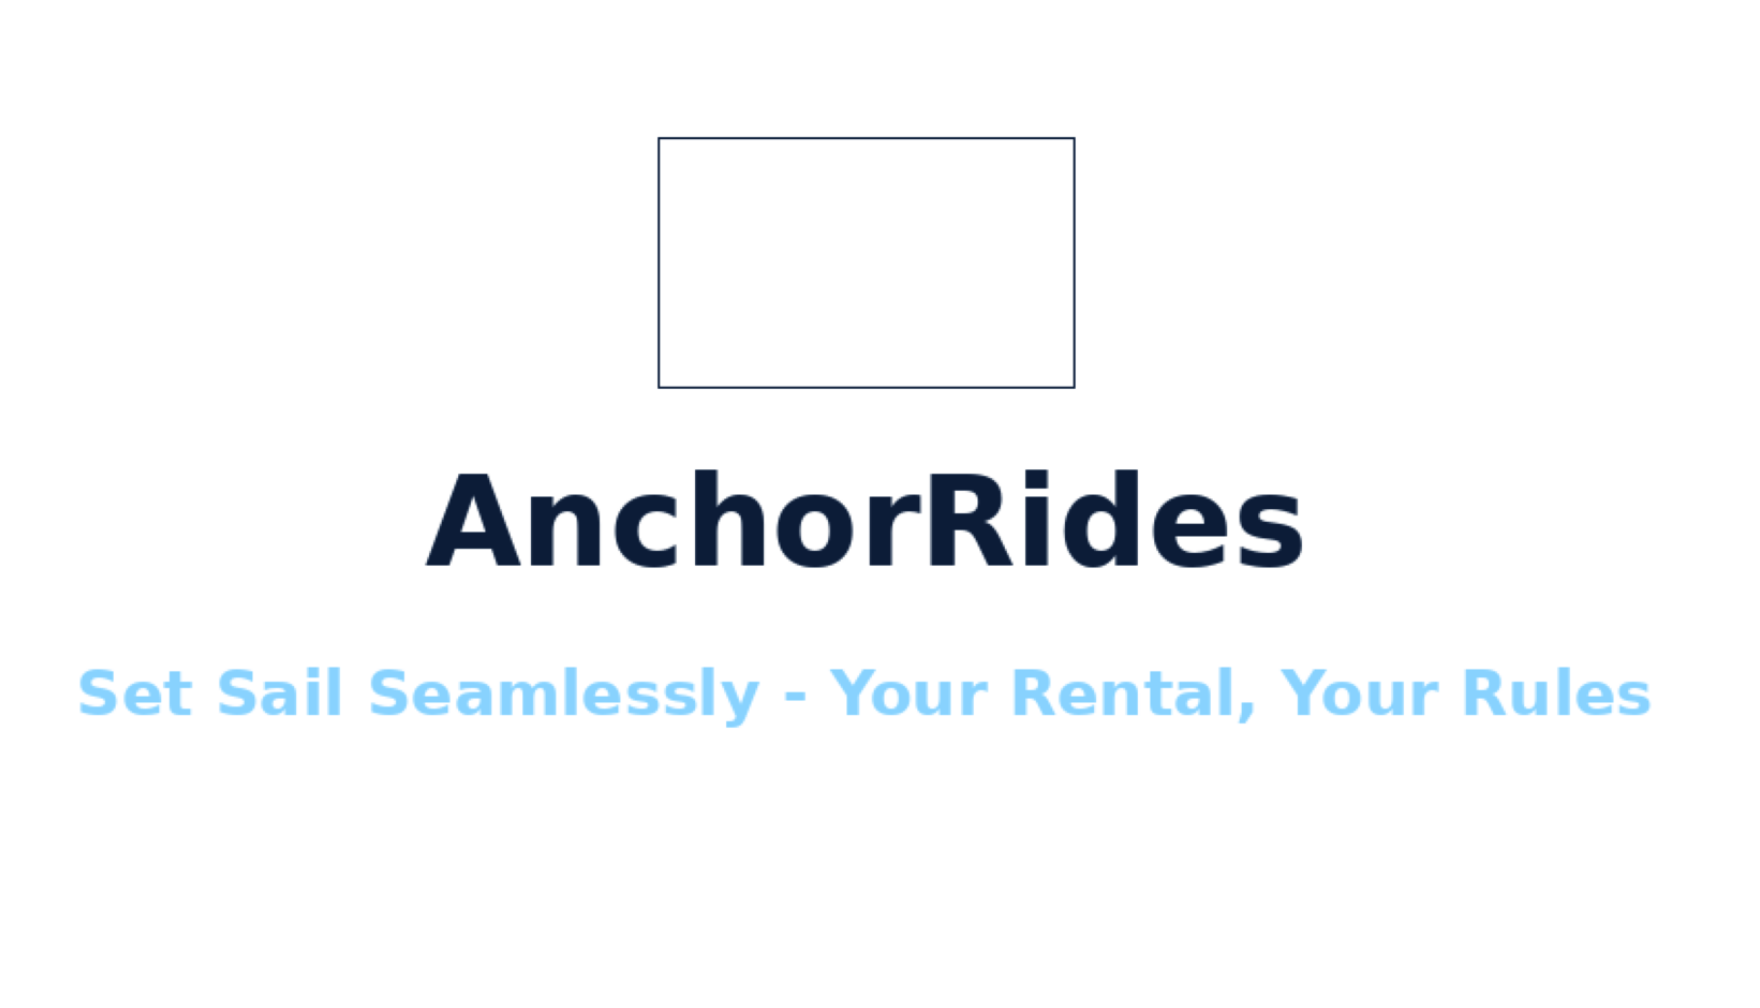
With just a few lines of Python code referenced in the reply, the Assistant produced an on-brand intro slide incorporating the startup's branding, name, and tagline.
While Assistants can't access Dalle-3 yet, it's still possible to create interesting visual results with just the code interpreter, although this can take a bit of back and forth with the Assistant.
Input:
Looks great! Can you come up with a geometric-based logo style graphic for the middle? Something that conveys a nautical theme.
Generated Slide:

Input:
I like the outside ring. Maybe make the internal graphic just a half circle or an A or something
Generated Slide:
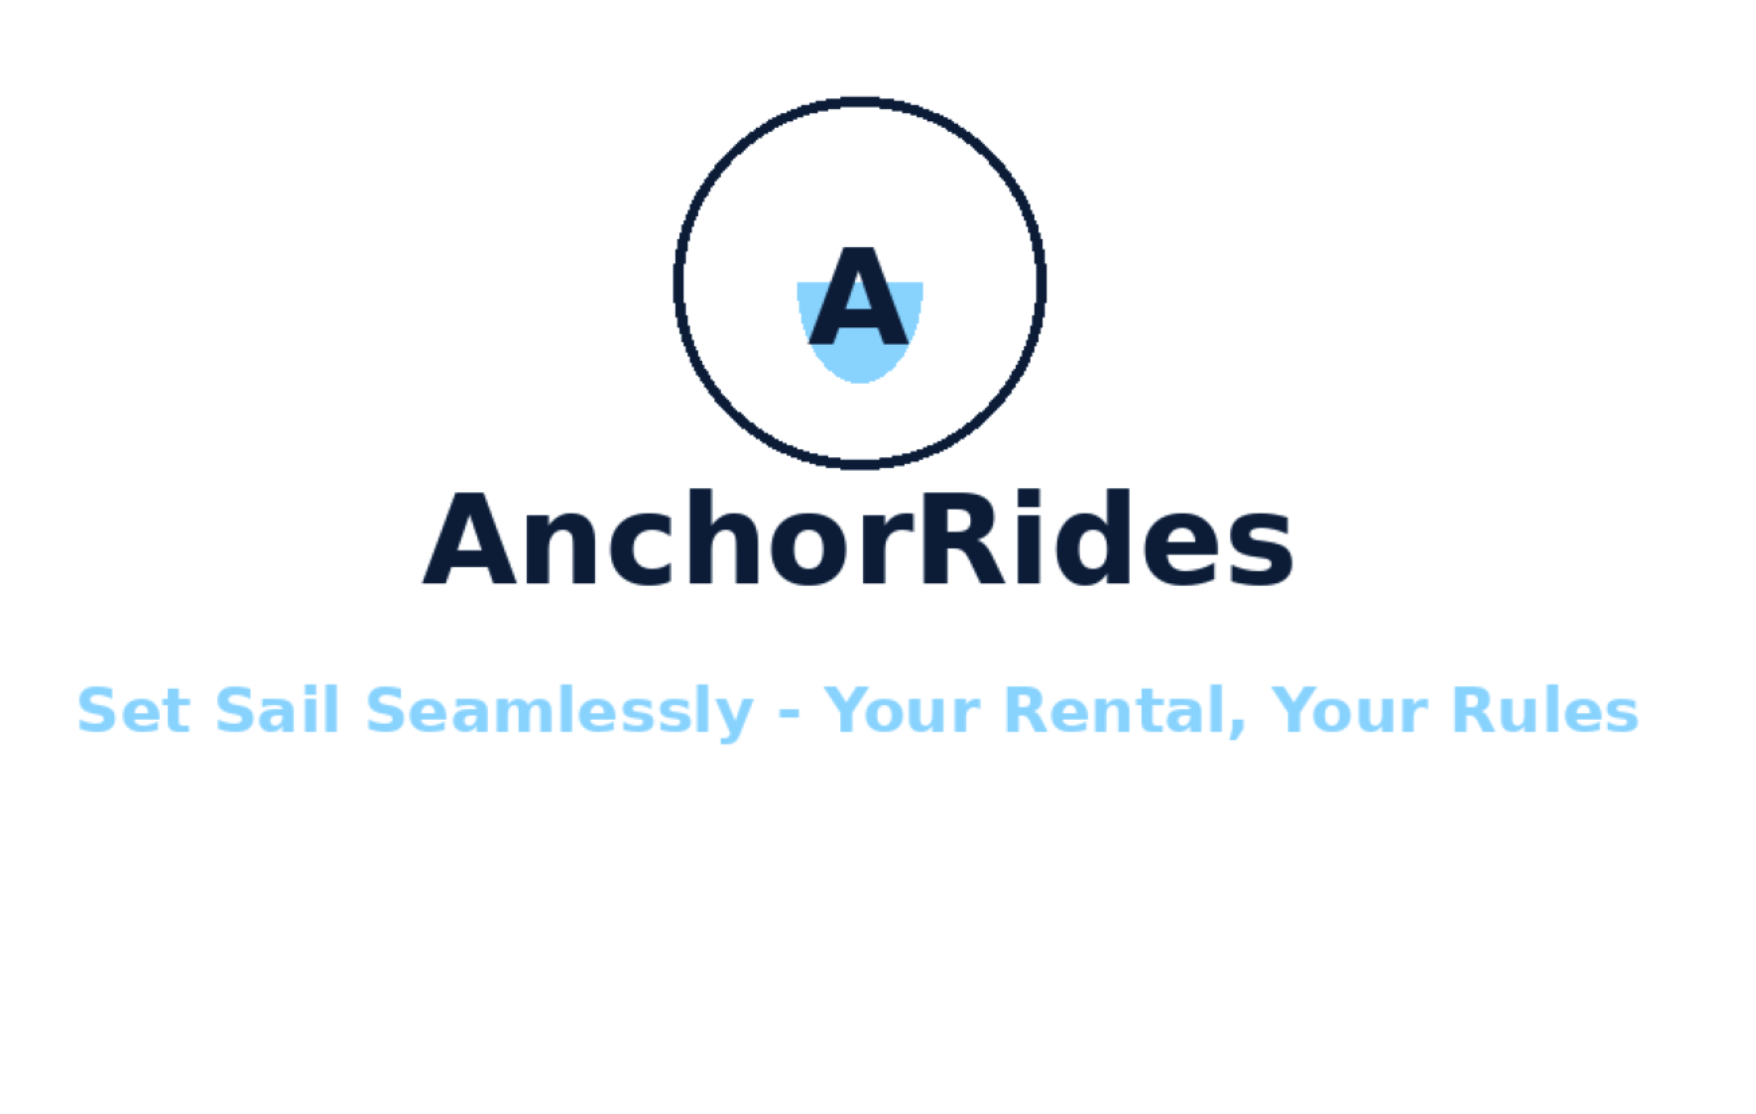
While this example slide still has a ways to go, the exercise provides insight into how the Code Interpreter can be used alongside other design-related prompts to create surprising graphic elements. In the next section, you'l use the Code Interpreter alongside Retrieval to create useable data visualizations.
Document Retrieval
One powerful capability the Assistant API unlocks is file integration. You can seamlessly upload document attachments like PDFs, images, and CSVs. This enables incredibly useful applications - you can provide relevant reference materials that the Assistant can draw insights from when having discussions or accomplishing tasks. For example, uploading a startup's marketing documents provides the Assistant with context about the company when generating new customized slides and presentation outlines.
Use caution when designing Assistants for external use, the Assistant can give this document to anyone chatting with the assistant. For example, if you upload a CSV of contact information from customers, anyone interacting might be able to access that file / data.
For this first experiment, you can use the provided marketing document and revenue CSV for a fictional Boston-based boat rental startup company.
Access Sample Documents here: Download the text document as a PDF and sheets document as a CSV.
Add files on the bottom left. Start by uploading Sample One Pager.pdf.
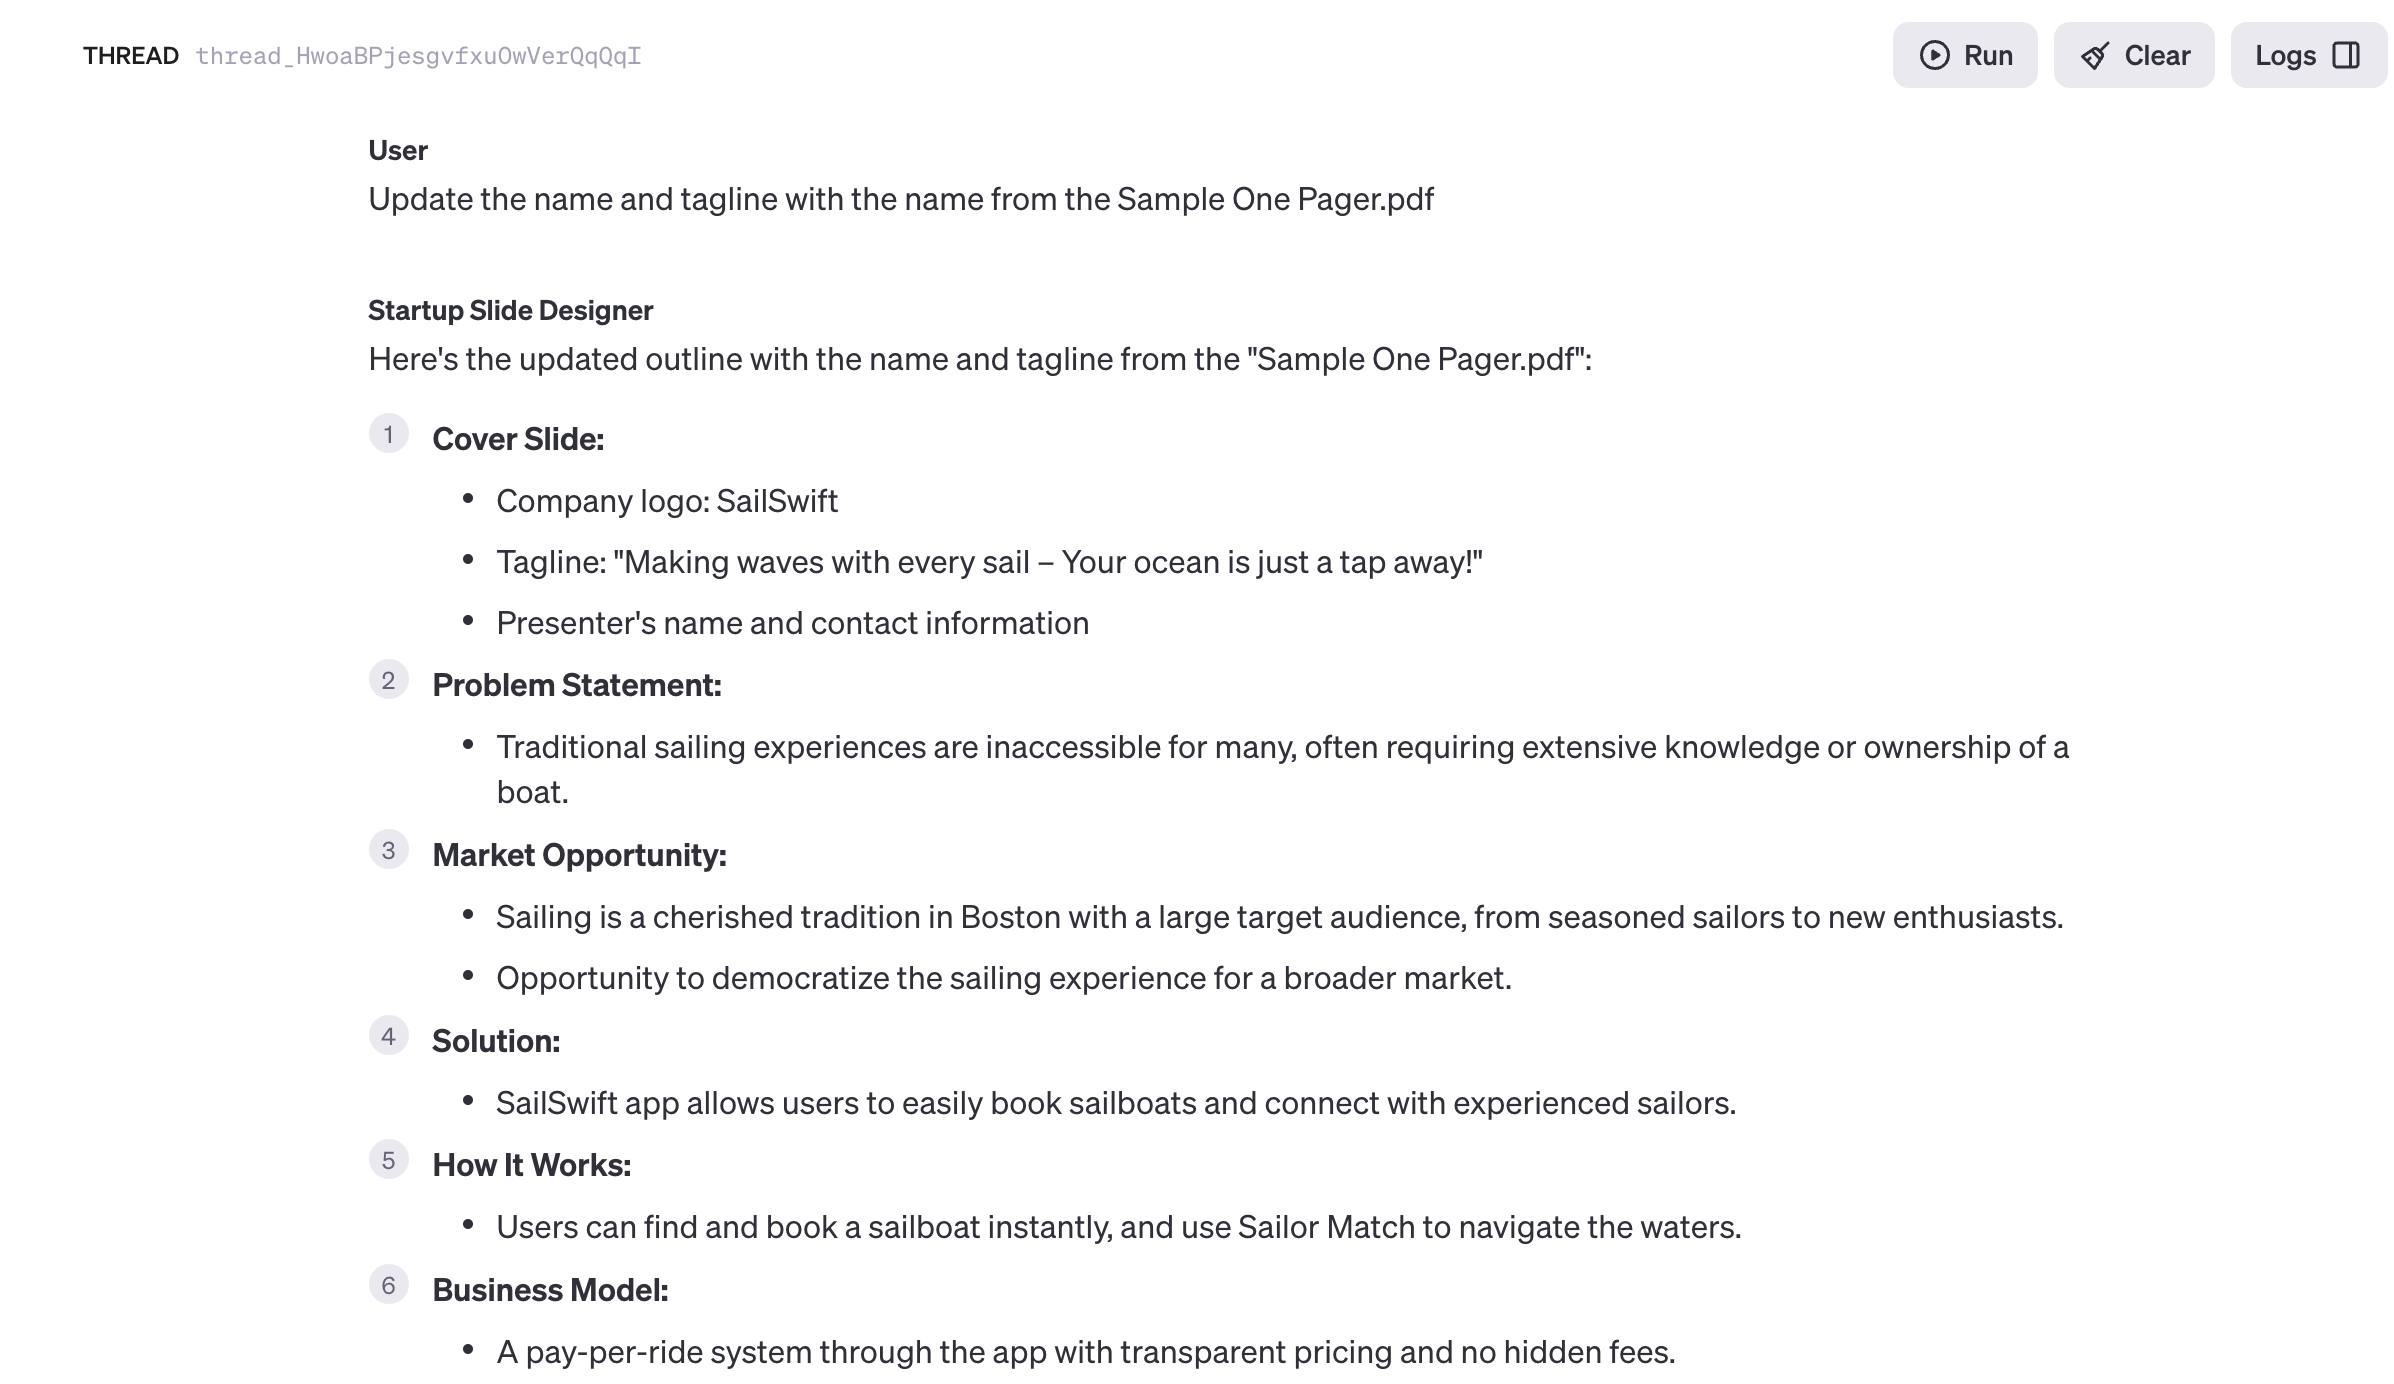
Press Save after the documents have been added. Now the Assistant can reference this data when generating responses. Try it out, with the prompt below the Assistant now generates a Slide Deck outline with relevant information based on the marketing document.
Input:
In the outline, fill in each of the slides using data from Sample One Pager.pdf
Response:
Create Visualizations
In addition to providing helpful context for conversations, Document Retrieval can also be used by your Assistant to generate relevant visualizations.
For example, rather than manually creating financial projection slides from a spreadsheet, you can have your Assistant analyze the data and instantly output easy-to-understand charts and graphs to use in your pitch deck.
The Sample sheet file contains a breakdown of this startup's projected revenue over the next 5 years. It includes annual revenue numbers across three business segments and sums the total projected annual revenue.
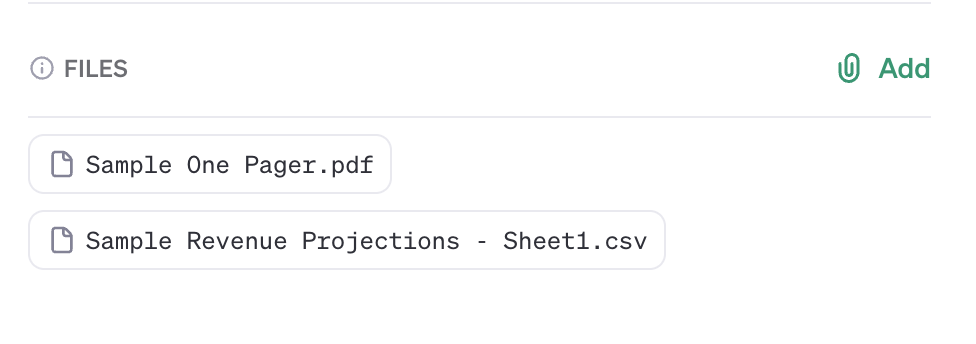
Download Sample Revenue Projection as a CSV and upload it to the Files section on the left, then press Save.
Now that you've uploaded the Sample Revenue Projections dataset, you can leverage the Assistant's Code Interpreter. Here's one way to instruct the Assistant to visualize this multi-year financial data.
Input:
Use the data in Sample Revenue Projections - Sheet1.csv to create a graph for a "Future Growth" slide. Break into 4 categories based on headers: Product Sales, Subscriptions, Services, and Total Revenue. Highlight "Total Revenue" in an interesting way.
Generated Visualization:
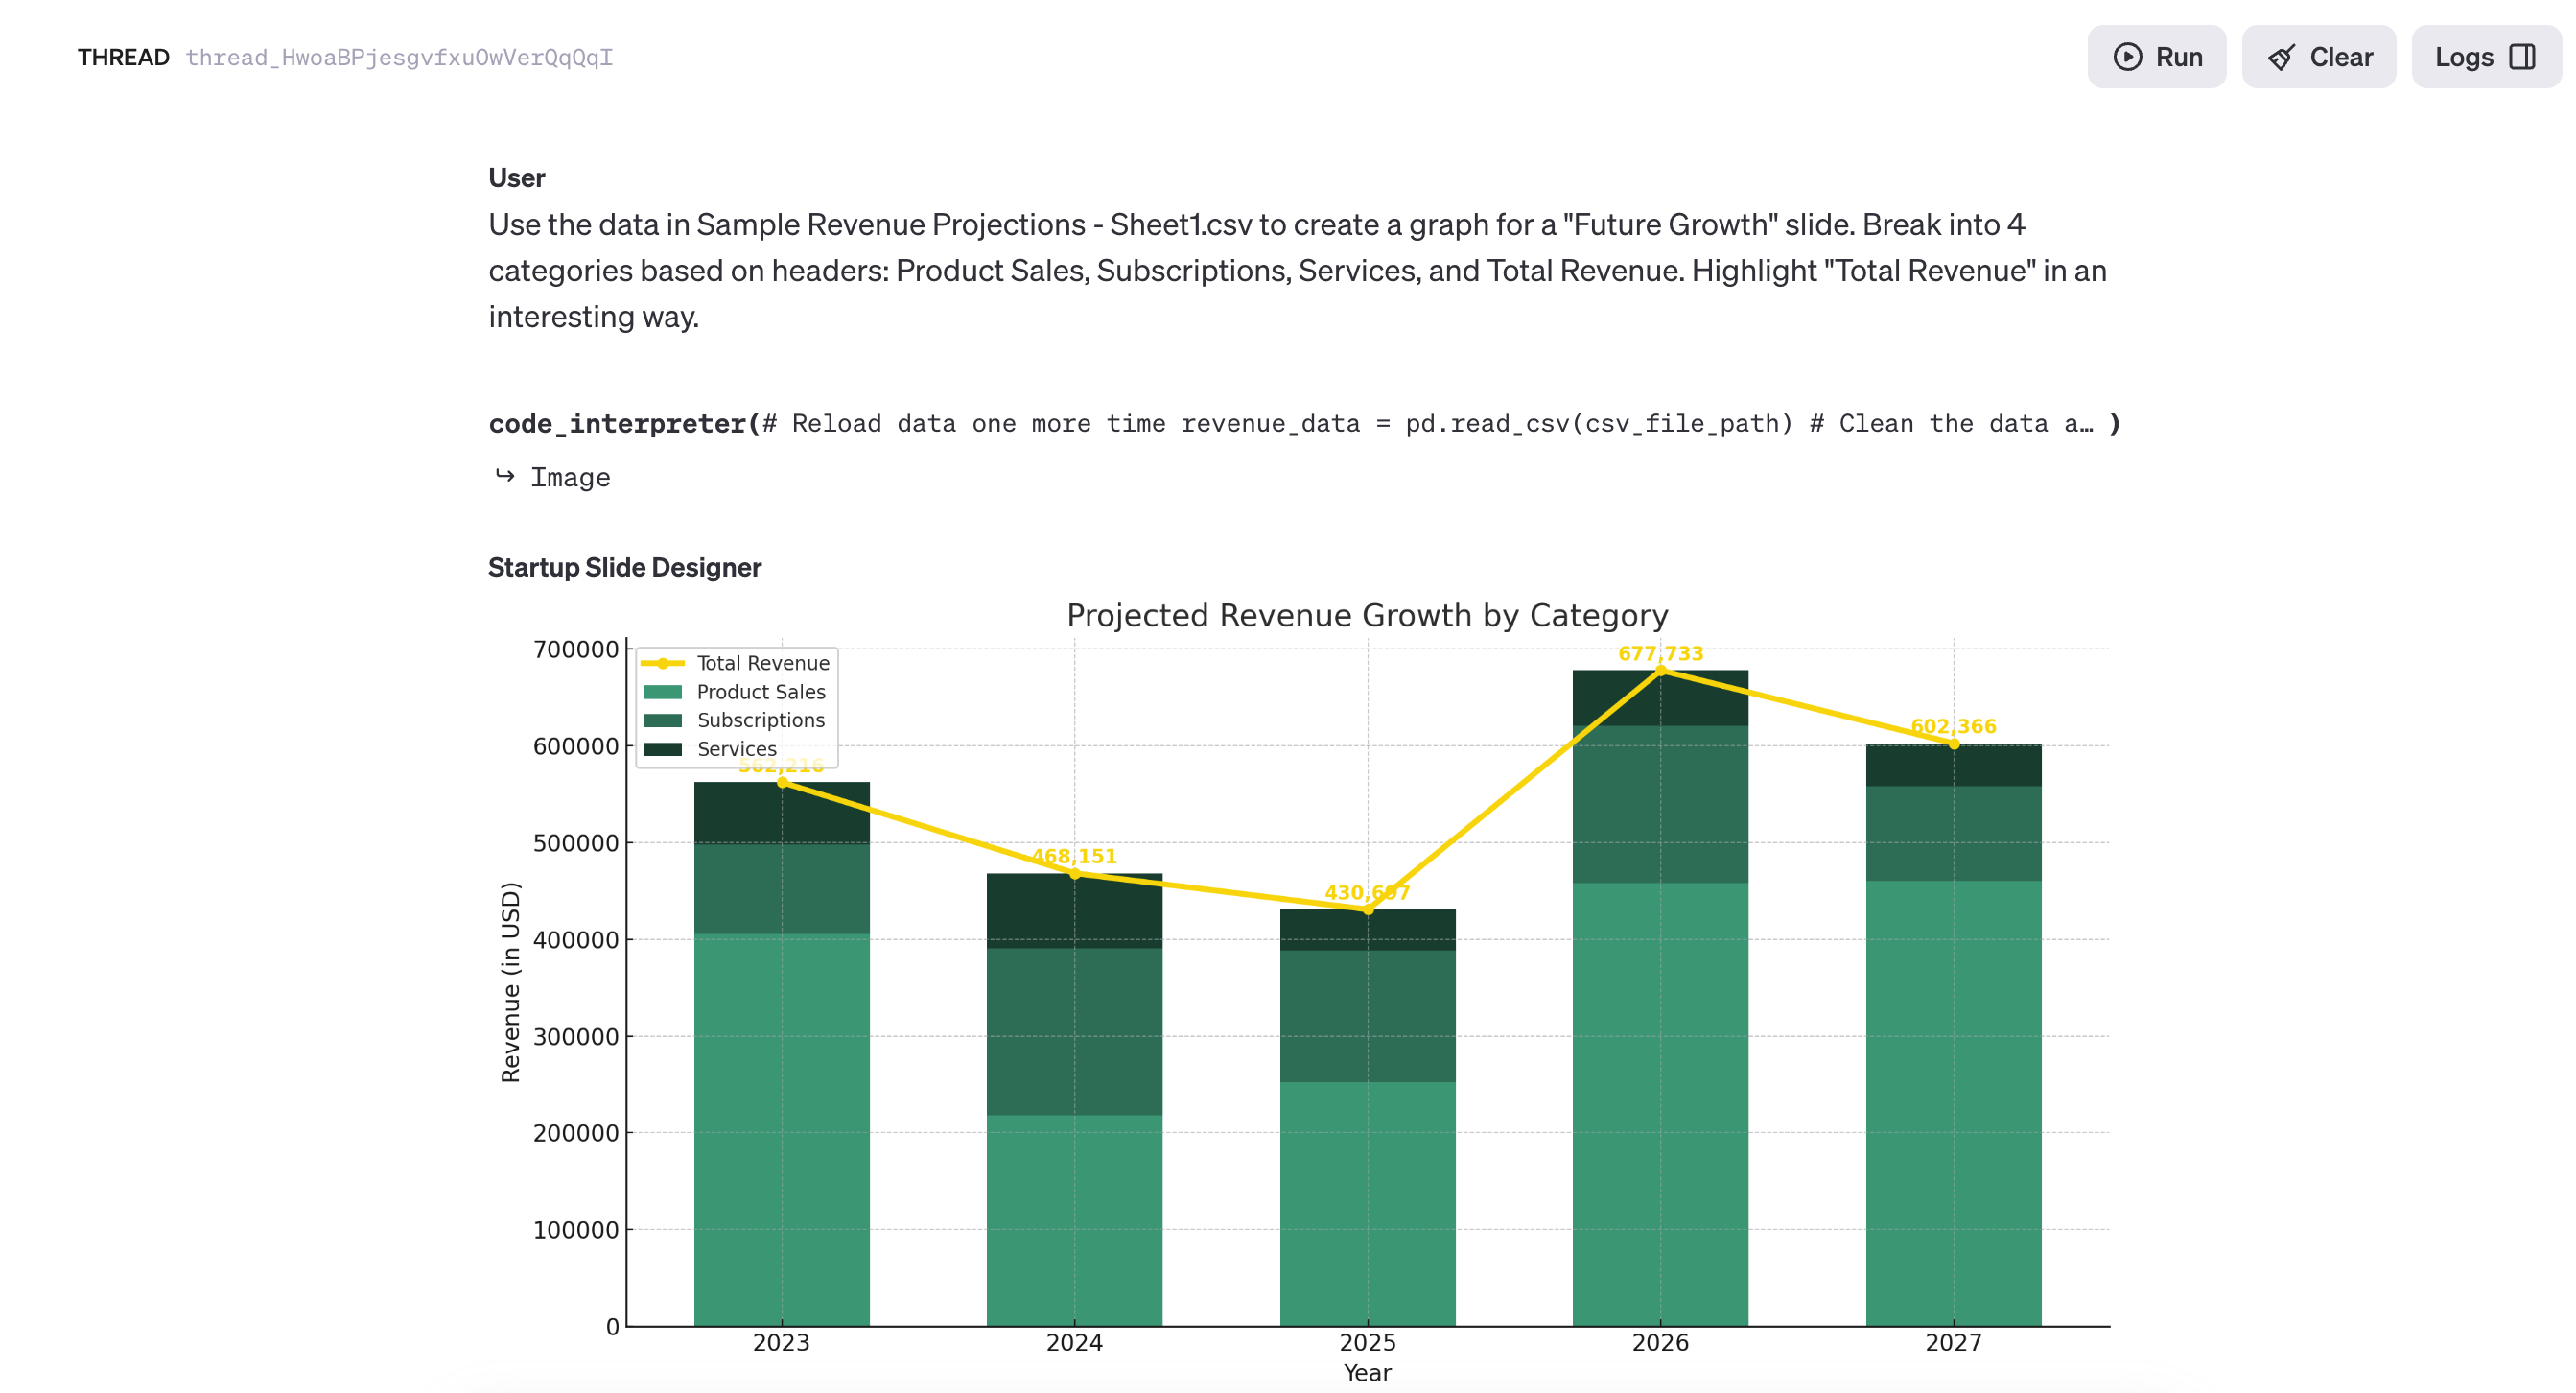
As demonstrated, the Assistant enabled automated data visualization creation by processing the uploaded revenue projection CSV. By generating Python code with the Code Interpreter, the Assistant produced an insightful graphic tuned to the financial forecasts for this rental startup.
Enhancing assistants with external data unlocks significant automation potential. Rather than manual manipulation in slides, the Assistant handled computation and design. This project illustrated:
- Augmenting assistants through file integration
- Delegating data analysis and visualization tasks
- Accelerating workflows through automation
Assistants are powerful because you can connect them to your applications, embedding them into workflows. In the next Section, you'll connect to the Assistants API outside of the Sandbox environment using the Python programming language.
Open Code (Google Colab) to follow along.
In this section, you'll create an AI-powered photo editor using Python in a Google Colab notebook, leveraging both built-in Python imaging libraries and external APIs to programmatically manipulate photos by adding a variety of effects and filters. By the end, you'll have built your own functional photo editing Assistant from scratch using Python.
Transitioning from the Playground interface to Python code unlocks more advanced customization of your Assistant. With External Functions, you can build integrations like Slackbots for fluid team conversations or linking smart home platforms to automate physical spaces, opening garage doors or turning on lights.
The project walks through adding a sepia filter to a photo. See one version of the resulting images in the photos below, but since this is an LLM your output might look slightly different, even if you run the code cells all as-is.


Google Colab
Google Colab is a free, cloud-based platform that enables users to write and run Python code via their browser. It's ideal for this tutorial because it requires no local setup, offers free access to powerful computing resources like GPUs, and facilitates easy sharing and collaboration. Using Colab is straightforward: you simply open a new notebook, write your Python code in cells, and run them to see the results instantly. This makes it an excellent tool for learning and experimenting with Python.
To run Colab, click inside a cell and press Shift + Return on your keyboard, or press the play button to the left of the cell. It's important that cells are run in order, or later cells will cause an error.
API Key
To get started, run the first four cells. Connect your OpenAI account to this Colab notebook with an API Key. To create an API Key, visit platform.openai.com/api-keys, create a new key, and paste it in to the text input that appears under Cell #3 after it's run. Make sure you've copied they key on the OpenAI site! Once you click off the modal the key will never be accessible again. If this does happen, no worries, you can always create another one.

Upload a Photo
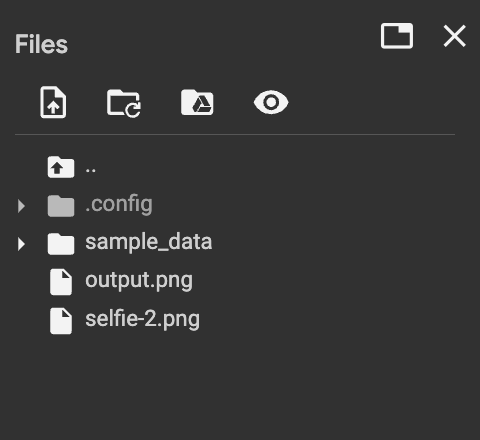
Before even creating an Assistant, upload a photo for it to edit. The examples below use an AI-generated selfie, but feel free to add any photo you'd like to edit for this exercise. Upload the photo on menu on the left side of your Colab notebook. When you see a warning, click "Okay," it's letting you know that these photos will be deleted once you leave the Colab notebook. This is a great tip, it means to make sure to download anything that you want to save for later.
Add this photo to your Assistant, the same idea of documents being added in Project 1. Copy and paste the photo path using the 3 dots to the right of the image, replacing /content/selfie-2.png with your file path.

Create a New Assistant
Next, execute the Create the Assistant code cell to instantiate your new custom assistant leveraging the image uploaded in the previous step.
Take note of the file_ids=[file.id] parameter that is passed on line 8. This links the image file to the assistant by registering its unique ID.
After running the cell, you will see the Assistant ID printed below - this matches the ID displayed in the OpenAI web interface. This ID acts as a unique handle for programmatically interacting with our created assistant.

Converse with Threads & Runs
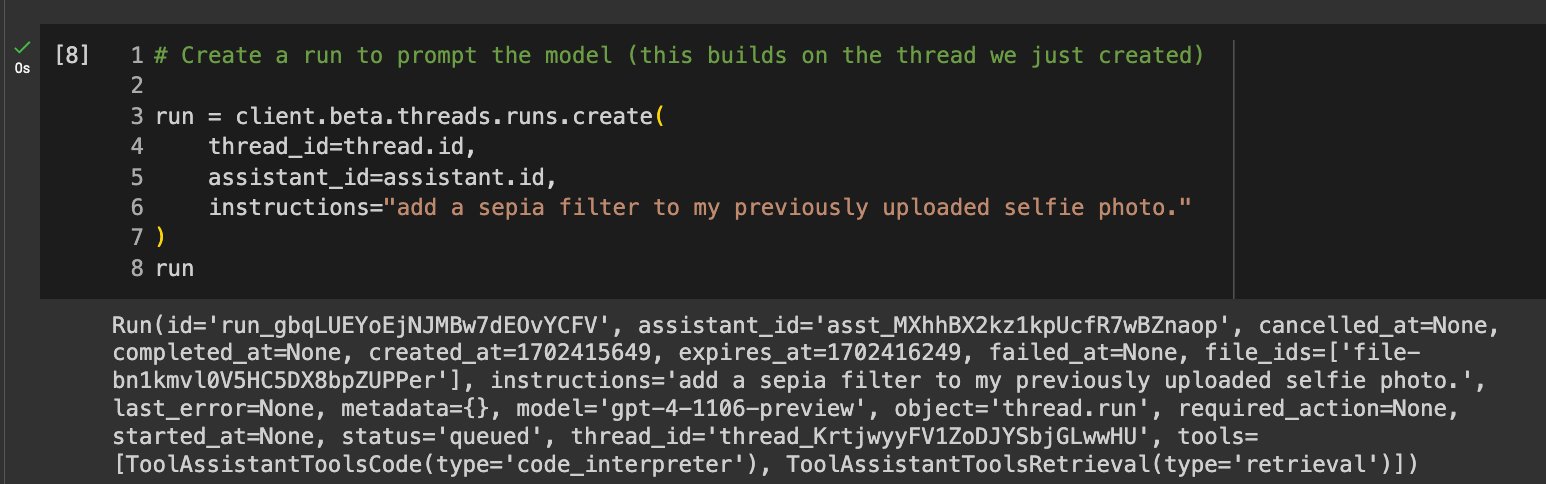
With a new assistant now created, you can begin interacting with it programmatically. Conversations take place within threads - contextual frames containing back-and-forth message sequences.
.png)
Instantiate a thread by executing the next code cell:

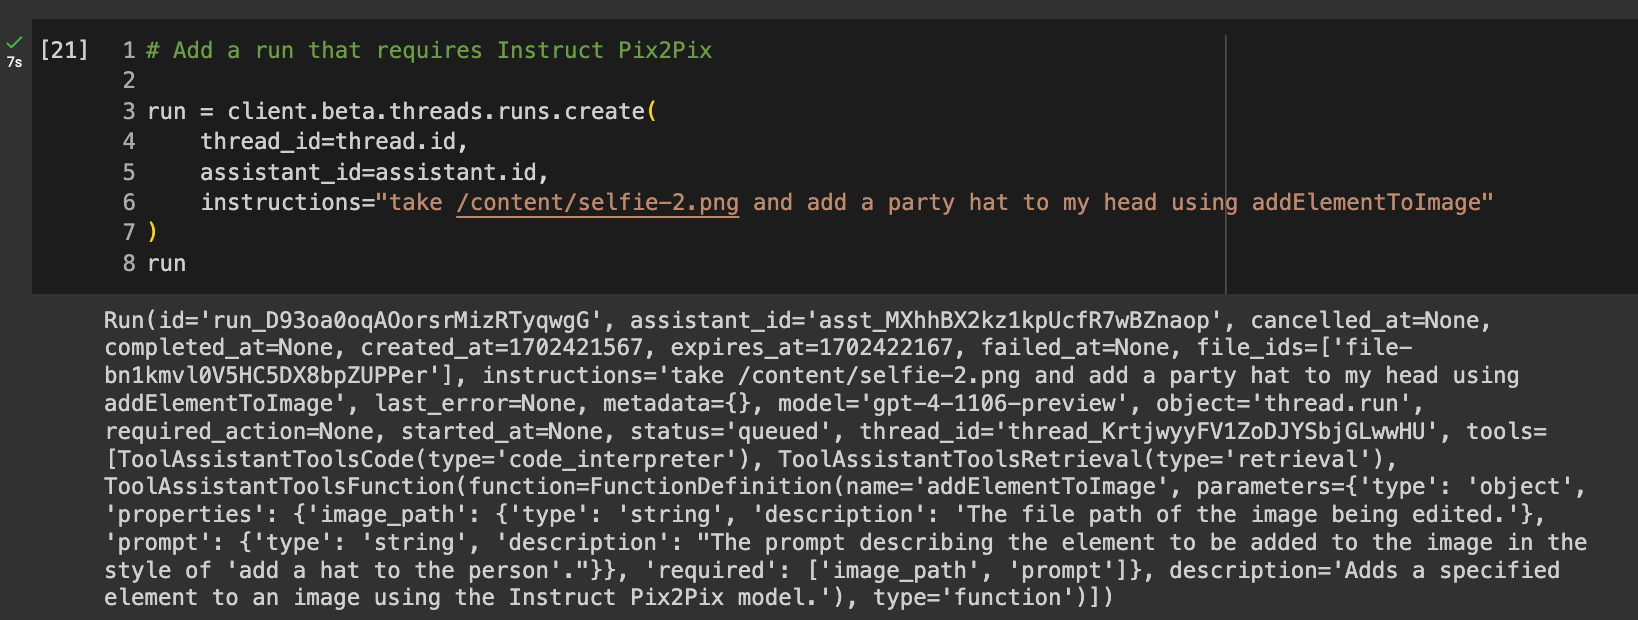
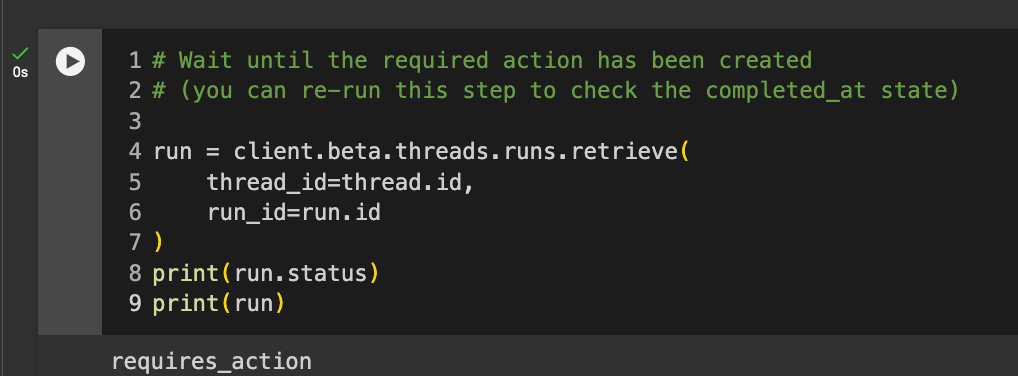
You can utilize this thread to exchange messages by creating a new run. As shown in the accompanying screenshot, line 4 attaches the run to the thread created above by passing the thread_id parameter. Instructions on line 6 are the actual prompt.
When executing this code cell, information on the run will print below, containing details like the usage token and model queried. This mirrors the data visible when inspecting logs in the Playground.
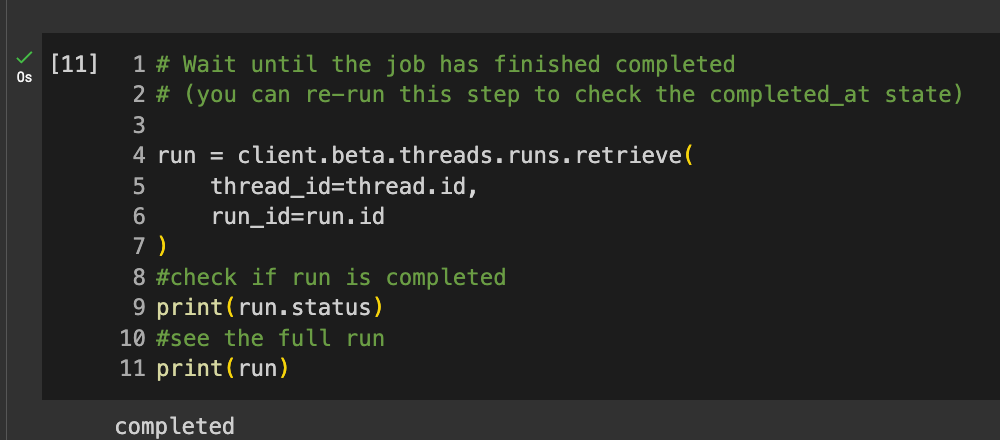
This next code cell sends prints the run status property. Note that the initial status will be processing while a response is being generated. It is important to wait for the status to change to completed before advancing.
Attempting to access the reply too early will trigger an error, only once the run completes will the full two-way exchange be available. This status indicator thus acts as a gatekeeper, signaling when it is safe to proceed after asynchronous processing finishes behind the scenes.
Save Photos
When the run status indicates completed” check the response messages for your edited photo. As assistants can return multipart exchanges, you might need to iterate through the Message array.
In the example screenshots below, the content at index 0 contains metadata of the transferred image file. Changing the subscript to 1 accesses message text from the assistant itself.
This second message object within messages.data[0].content[1] houses the actual message text under the value property:
“I have applied a sepia filter to your selfie photo. You can download the modified image from the following link: [Download Sepia Selfie Image]”
Properly indexing through message content arrays allows you to separate files from text responses in these multipart exchanges.
![Code reads: # Show the latest message messages = client.beta.threads.messages.list( thread_id=thread.id ) messages.data[0].content[0]](https://cdn.prod.website-files.com/61c4cc1ea790bc571dff495a/6578d0ad45a43223183b84a2_message-0.png)
![code reads: # Show the latest message messages = client.beta.threads.messages.list( thread_id=thread.id ) messages.data[0].content[1]](https://cdn.prod.website-files.com/61c4cc1ea790bc571dff495a/6578d080aa9876584191c1a0_message%201.png)
When downloading output files, determine if your assistant's response encodes the file as:
- MessageContentText: Directly embeds file object within text response body.
- MessageContentImageFile: Attaches file(s) as annotations to the message.
To programmatically save returned files:
If the file is enclosed within MessageContentText, run the code cell starting with:
# Download a file from "file"
If the file is enclosed within MessageContentImageFile, run the cell starting with:
# Download a file from "annotations"
Making sure to match the appropriate download code to the surfaced content type avoids errors.
Once you've run the correct cell, your image will be saved on the left as output.png. Double click on it to see the outcome, or right click on it to download it. This image should look like your original image with a sepia filter applied.
Try Other Effects
Feel free to experiment with additional image editing effects! You can rerun the cells starting from # Create a run to retry modifications with different parameters and filters.
Some ideas to explore with Python image libraries:
- Resizing to higher or lower resolutions
- Altering color balances like contrast and saturation
- Overlaying multiple images for collages
- Applying artistic styles like oil paint or pencil sketch
- Adding custom text captions or watermarks
Take time to play around with photo enhancements or transformations. Use the starter code cells to guide appending editing steps, while customizing the effects and assets used.
External Functions
Saving the best for last, external functions are the most exciting new feature of Assistants. External Functions are how the Assistant interacts with the outside world, for example how you'd add an event to your calendar or actually apply what you've generated to a Google slide deck.

Up to now you've used Python imaging libraries to edit photos programmatically. It's possible to take this further with external functions by tapping into AI models for advanced effects through Replicate's InstructPix2Pix API.
Replicate makes it easy to use state-of-the-art machine learning models with API calls. No need to sweat the complex model setup or training - it's all handled behind the scenes. Specifically, InstructPix2Pix modifies images based on natural language inputs. Instead of coding every photo filter and effect manually, you can just write detailed prompts like "make this photo look vintage and faded with torn edges."
To start using Replicate, you'll need an account and API key:
- Create a Replicate account
- Create an API Token
- Run the setup code cell that starts with # Extend photo editor with functions! and a text box below will appear to paste your token
- Press enter after pasting your credentials to activate the integration
![Code reads # Extend photo editor with functions! # Sign up at https://replicate.com/ #API token at https://replicate.com/account/api-tokens os.environ["REPLICATE_API_TOKEN"] = getpass.getpass('Enter your API key: ')](https://cdn.prod.website-files.com/61c4cc1ea790bc571dff495a/6578d85b79856c849893c959_replicate-key.png)
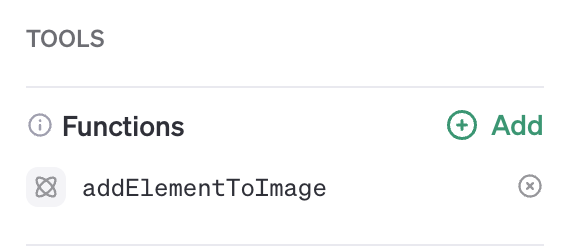
For assistants to leverage external functions, they first need to be registered in the Assistant's Function library. This provides necessary context on:
- What capabilities the function enables
- When to trigger the function call
- How to execute the function technically - the list of arguments and type they expect
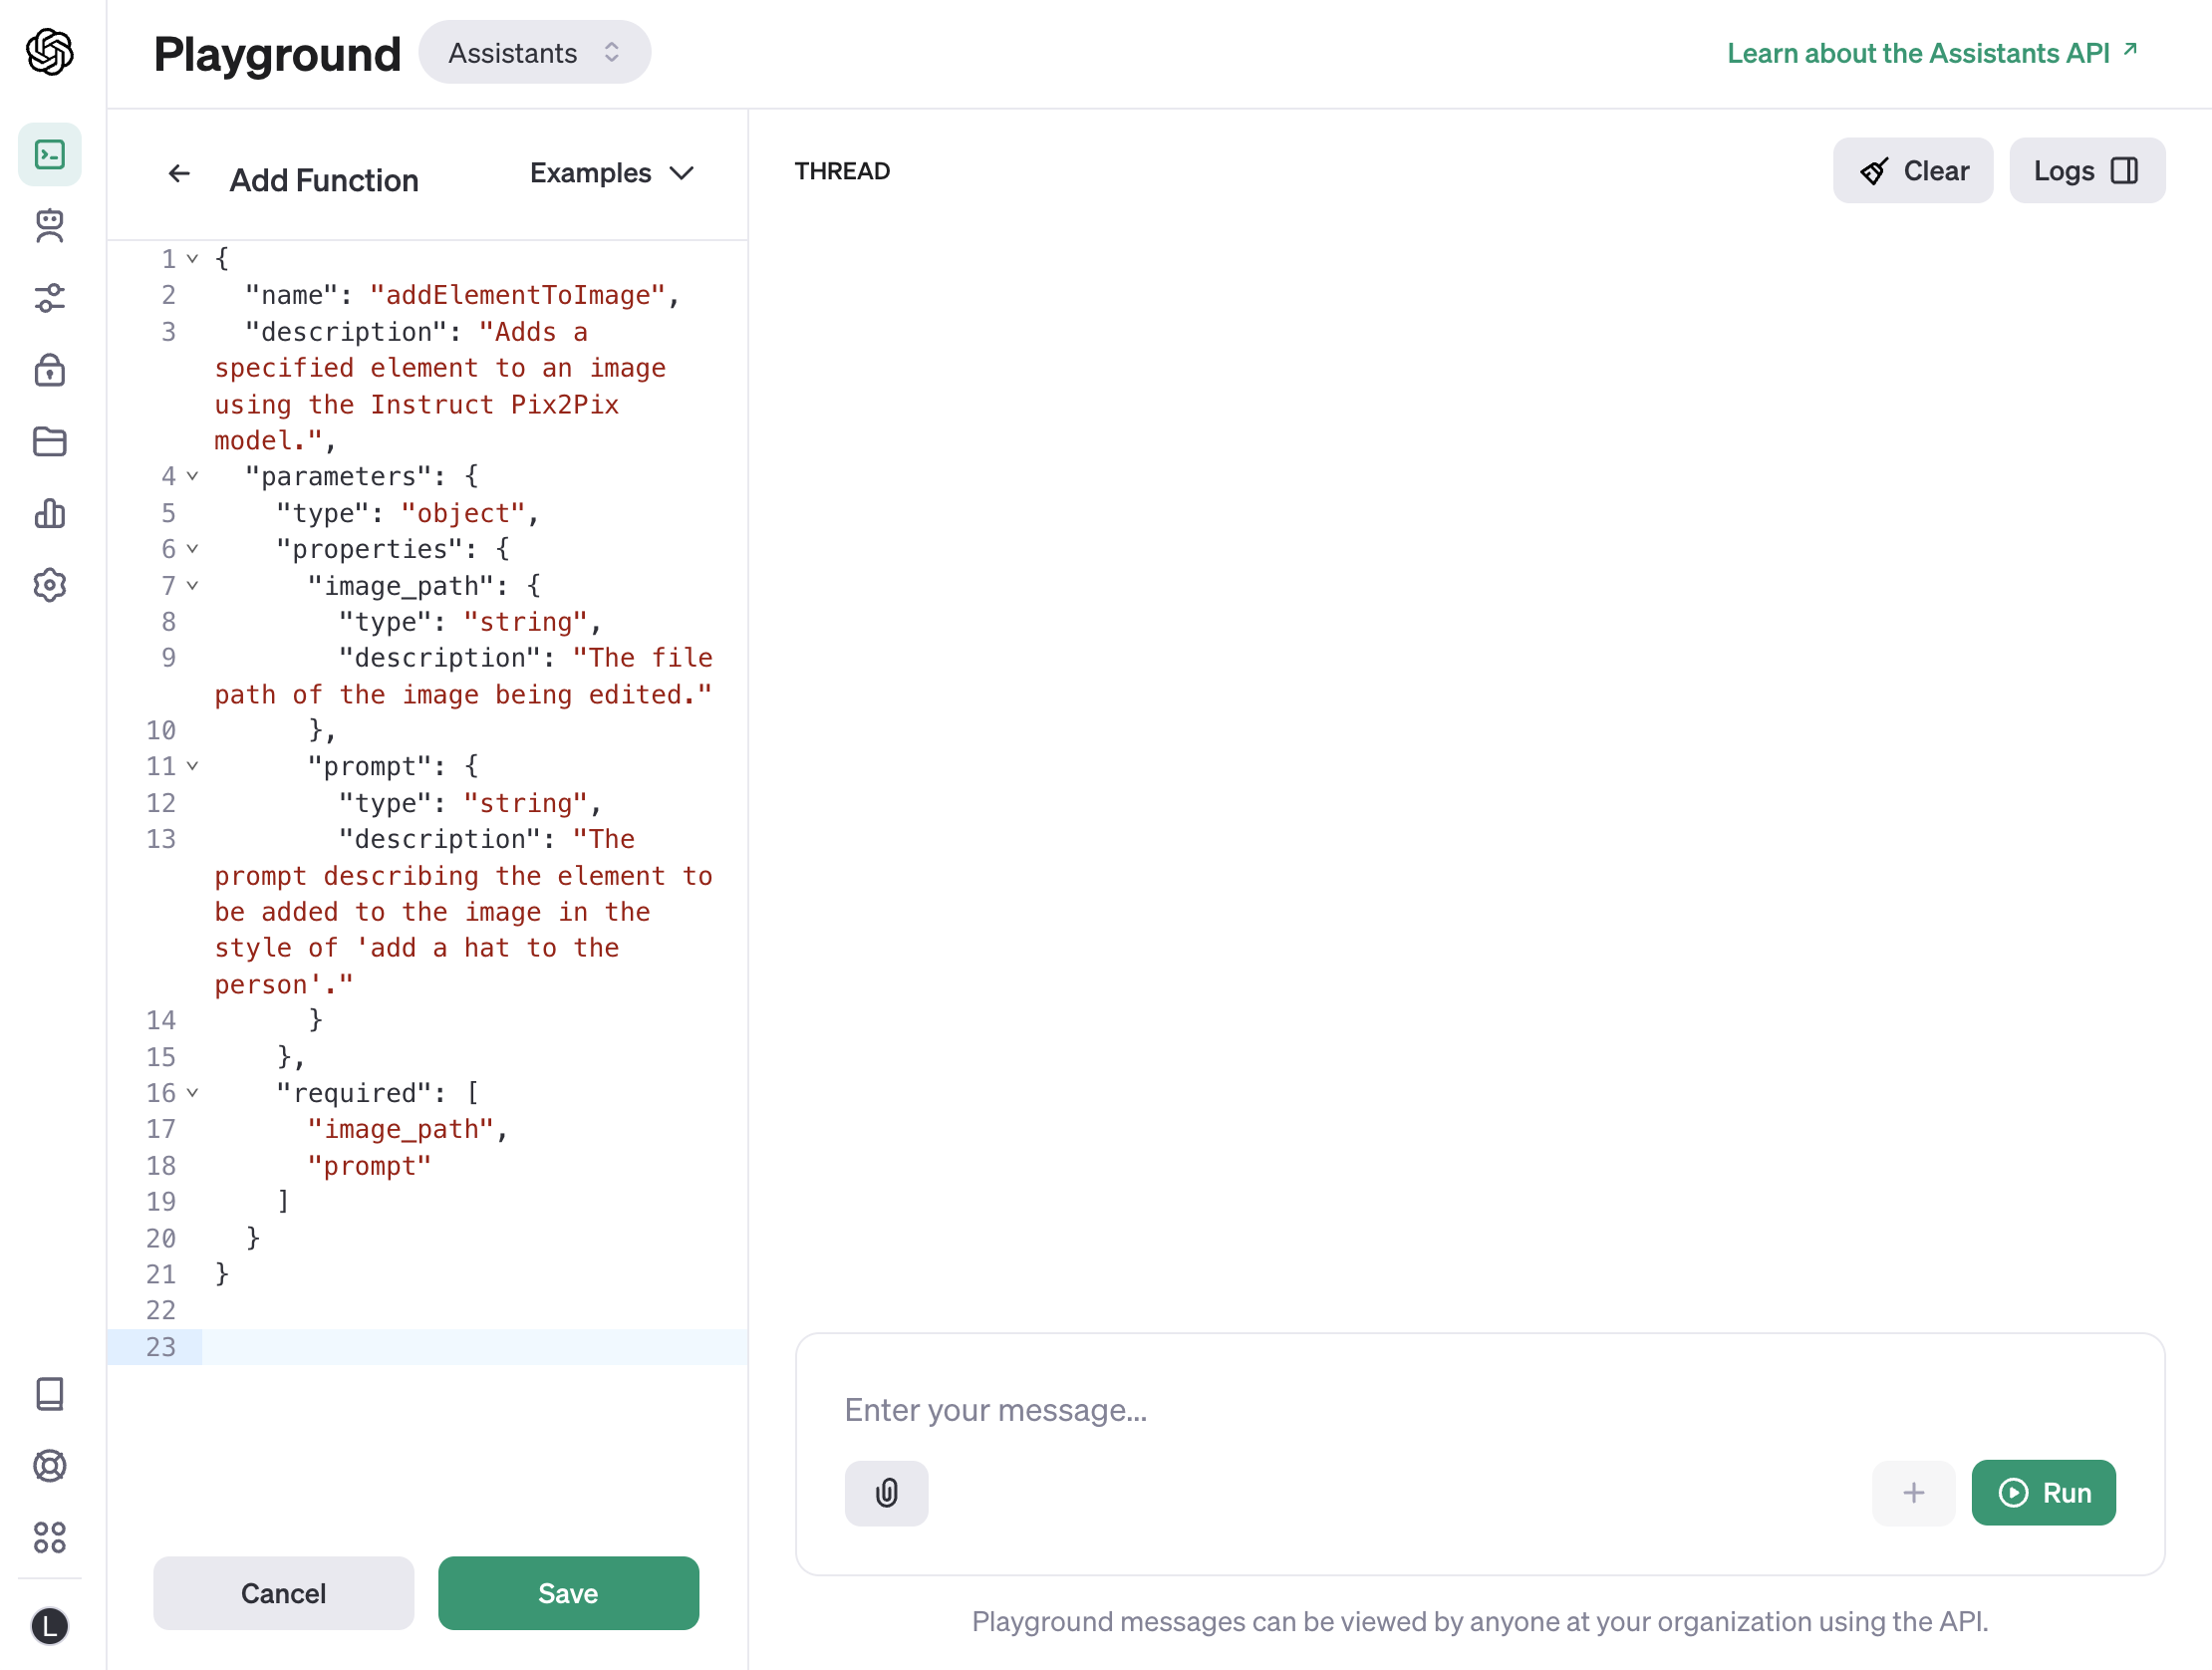
As an example, in the Playground interface for your current assistant, Click "Add" next to Functions on the left and add the following code:
{
"name": "addElementToImage",
"description": "Adds a specified element to an image using the Instruct Pix2Pix model.",
"parameters": {
"type": "object",
"properties": {
"image_path": {
"type": "string",
"description": "The file path of the image being edited."
},
"prompt": {
"type": "string",
"description": "The prompt describing the element to be added to the image in the style of 'add a hat to the person'."
}
},
"required": [
"image_path",
"prompt"
]
}
}
There are a few steps to setting up external functions. The first, is to run the cell that sets up the function, defining it in your Colab environment.
![Code reads: def addElementToImage(image_path, prompt): output = replicate.run( "timothybrooks/instruct-pix2pix:30c1d0b916a6f8efce20493f5d61ee27491ab2a60437c13c588468b9810ec23f", input={"image": open("/content/output.png", "rb"), "prompt": prompt, "image_guidance_scale":1.75} ) return output[0]](https://cdn.prod.website-files.com/61c4cc1ea790bc571dff495a/6578e42938762eb06bb8886e_Create%20function.png)
In the run, the prompt specifically requests that the action be taken "using addElementToImage".
Read the output from the run. See the ToolAssistant reference, like the image above? If not, you may not have added the function to the Assistant properly in the previous step.
In the next code cell, check the run status. It will print requires_action if everything is done correctly. It requires action instead of being complete, because it requires a few additional steps before the external function will run.
Run the get_outputs_for_tool_call cell. The bottom part of the code processes a list of tool requests. The get_outputs_for_tool_call function is the function that prepares data for the external function and then parses the response for the Assistant to generate a message with.
![Code reads: def get_outputs_for_tool_call(tool_call): image_path = json.loads(tool_call.function.arguments)["image_path"] prompt = json.loads(tool_call.function.arguments)["prompt"] print(image_path) print(prompt) image_output = addElementToImage(image_path, prompt) return { "tool_call_id": tool_call.id, "output": image_output } tool_calls = run.required_action.submit_tool_outputs.tool_calls tool_outputs = map(get_outputs_for_tool_call, tool_calls) tool_outputs = list(tool_outputs) tool_outputs](https://cdn.prod.website-files.com/61c4cc1ea790bc571dff495a/65793a4c03162e337bfa8e27_outputs.png)
Once that's finished running, run the next three cells to
- Add the output from the external function to the run
- Retrieve the run, and
- Read the final message and open your photo at the printed link
In the screenshots below all three cells are run with the data about the run and messages printed below each cell.
![Final 3 cells in the Colab: # Add tool output to the run run = client.beta.threads.runs.submit_tool_outputs( thread_id=thread.id, run_id=run.id, tool_outputs=tool_outputs ) run # Retrieve last run run = client.beta.threads.runs.retrieve( thread_id=thread.id, run_id=run.id ) run # Read message messages = client.beta.threads.messages.list( thread_id=thread.id ) messages.data[0].content[0]](https://cdn.prod.website-files.com/61c4cc1ea790bc571dff495a/657945a7dea4232af476f56e_final-3-cells.png)
Open the link the Assistant includes in its message. How did your AI-edited photo turn out? Some images the Assistant created for me are below:
.png)
.png)
Credit Constraints
A challenge encountered by workshop participants was the depletion of usage credits. The necessity of purchasing additional credits to continue using the service can pose a barrier, especially for individuals just starting out.
Restricted Access to Models
Another limitation faced by participants was the inability to access the most recent version of OpenAI's models. While the GPT-3.5-turbo-1106 model provides the functionalities covered in the workshop, users were restricted from experimenting with newer models.
Limited Customization and Control
Users may find limitations in customizing and fine-tuning the AI models to their specific needs. While the OpenAI API offers a range of capabilities, there are constraints in terms of modifying model parameters, training on custom datasets, or adjusting the underlying algorithms. This can lead to challenges in achieving the desired accuracy or model output.
Data Privacy in Document Retrieval
The document retrieval aspect of the API also poses privacy concerns. The process of fetching and utilizing external content can potentially expose user data or queries to third-party sources. This raises questions about data confidentiality, especially in scenarios where the data being processed is sensitive or subject to regulatory compliance.
Security Concerns with External Functions
Using external functions, such as the code interpreter and retrieval features within the API, raises significant security concerns. When executing code or retrieving documents from external sources, there's a risk of encountering malicious content or compromising sensitive data. Users must exercise caution and implement robust security measures to mitigate these risks, especially when handling confidential or proprietary information.
In this tutorial, you've build Agents with the OpenAI Assistant aPI, one in the OpenAI sandbox and one in Google Colab, utilized advanced features like document retrieval and the code interpreter, and set up external functions with the Replicate API.
As you progress beyond Google Colab, consider exploring more robust and flexible development environments. Transitioning to a dedicated cloud platform like AWS, Google Cloud, or Microsoft Azure can offer greater control over your computing resources, scalability, and advanced features. These platforms provide the infrastructure to deploy external-facing applications.
